How to send SMS using Django

In this tutorial we are going to build a simple Django app that will be used to send SMS messages to people using africastalking API but you can still use your API of choice just follow along and learn how the app works first.
I am going to show you how the complete app looks like then I will explain how we built it.
SOURCE CODE
If you want to go straight to the source code of the app used in this tutorial , you can find it here
Feel free to download or clone it, you are free to do what you want with this app , change it , modify it , make it yours .
The homepage of our app looks like this
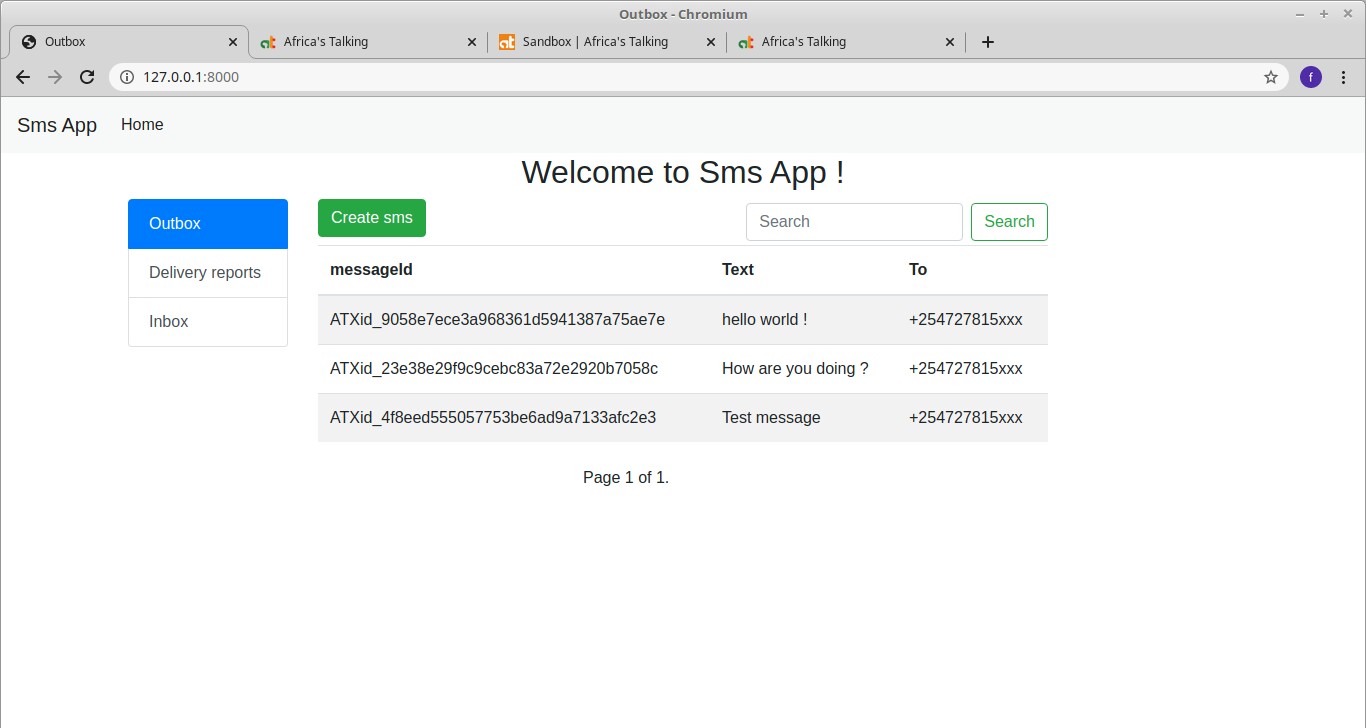
The above image shows the homepage of our simple Smsapp, you can see the page is divided in two, on the left side we have a menu which has outbox , deliveryreports and inbox and on the right side we have createsms button which is green in color , a search functionality and below it we have a table that shows the outbox or details of the sent message.
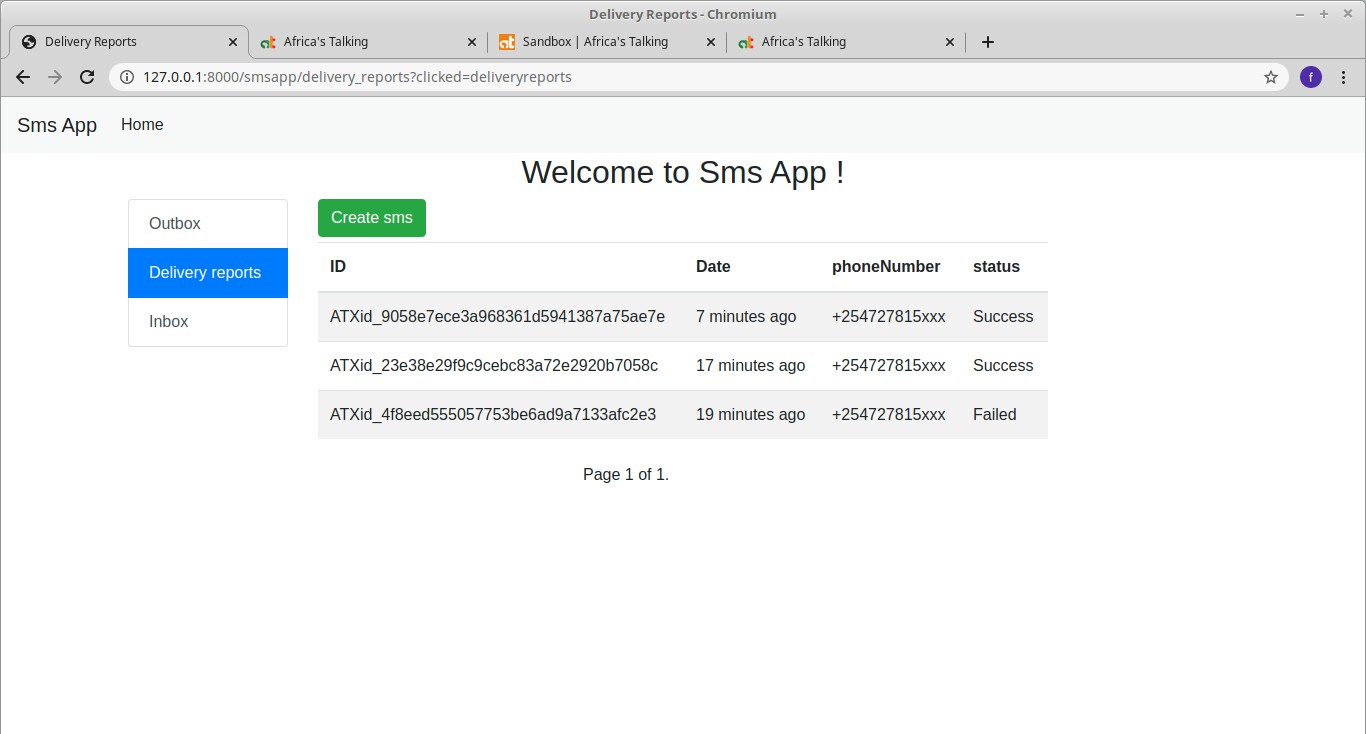
The above image shows the delivery report page, this is where you get to see whether your message was successfully sent and if not you will see it here.
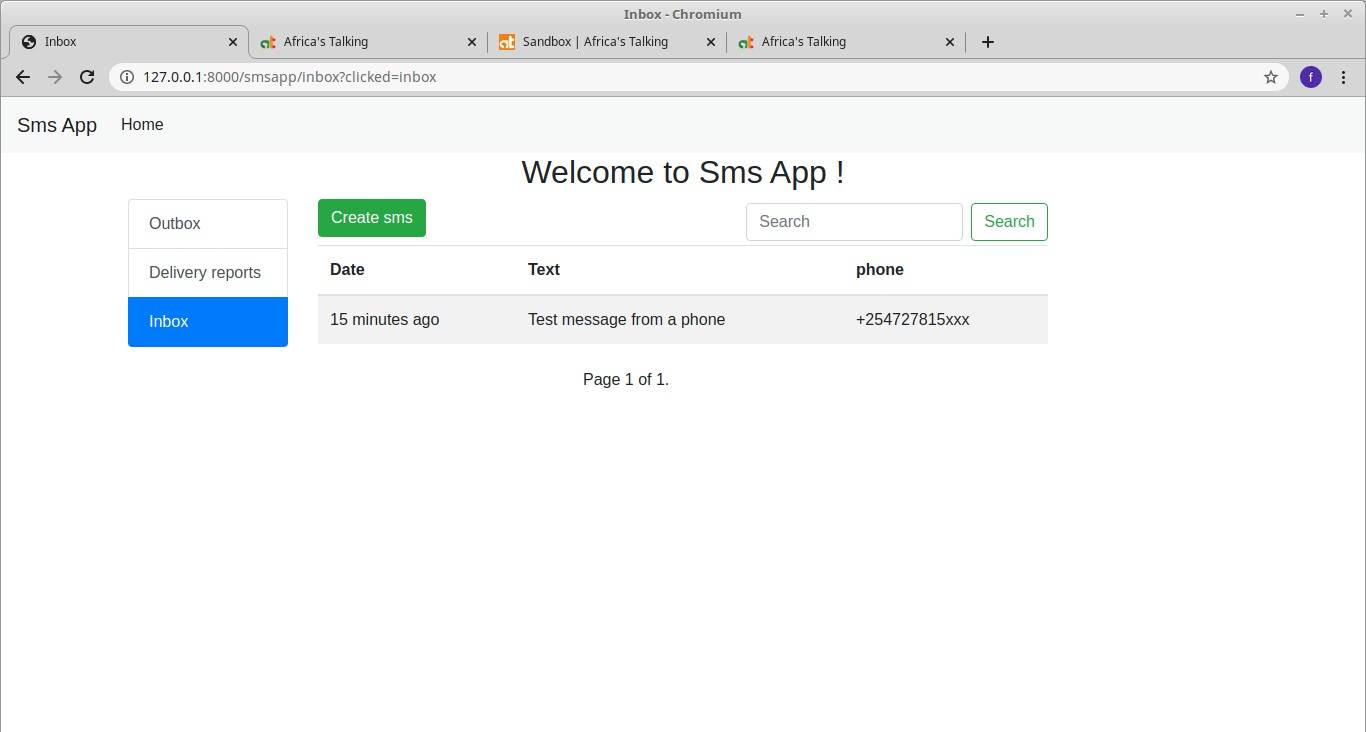
The above image is the inbox page, this is where the messages sent from people to your app is displayed, you can think of it as received messages from users or people.
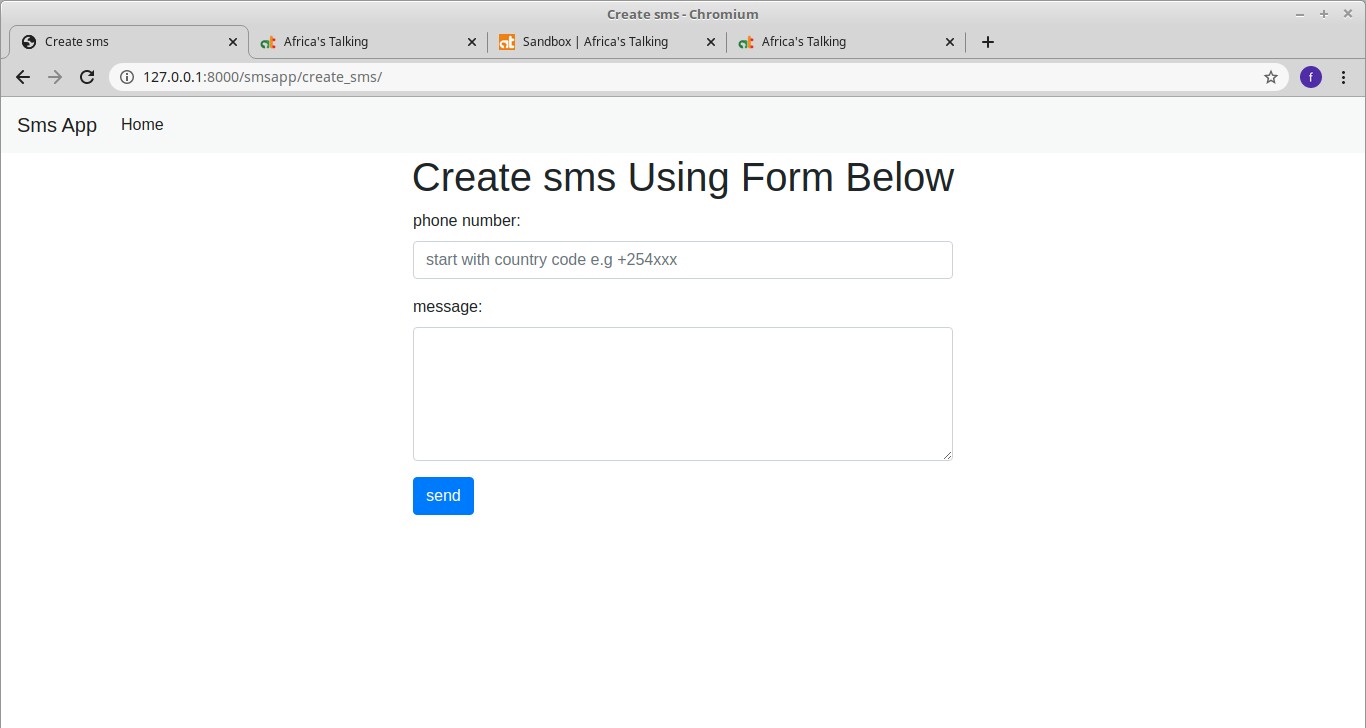
The above image shows the form used to create an SMS message to send to people, this form is displayed if you click on the green button named create sms .
so what is Africastalking API ?
First of all , Africastalking is a company based in Nairobi, Kenya with presence in multiple African countries which include Kenya, South Africa, Nigeria, Uganda, Tanzania, Rwanda, Ethiopia, Zambia and Malawi , the company provides a variety of communication and payments API products which include SMS, USSD, VOICE, AIRTIME and IOT. You can checkout more details on their website Africastalking and also you can watch this video Africa’s Talking Co-Founder Sam Gikandi on Building a Pan-African Tech Company to learn more about them.
Overview of How Sending and Receiving of SMS messages work using Africastalking API
Now if you are not in the countries covered by AT API don't worry , just follow along , you will still understand since most of the functionality is common across all API providers. in this section we are going to look at
- How to send SMS message to people using Africastalking API
- How we receive messages from users to our app using Africastalking API
How to send SMS message using Africastalking API
Now we are going to learn how to send a simple sms with python and Africastalking API
# sendsms.py

import requests

url = "https://api.sandbox.africastalking.com/version1/messaging"

headers = {'ApiKey': '9ea2c2ed6723e0ea77c7d81xyzxyz',
           'Content-Type': 'application/x-www-form-urlencoded',
           'Accept': 'application/json'}

data = {'username': 'sandbox',
        'from': '17163',
        'message': "Hello world !",
        'to': '+25472751xxxx'}


def make_post_request():
    response = requests.post( url = url, headers = headers, data = data )
    return response


print( make_post_request().json() )
The above code is a python code to send SMS message using Africastalking API , you can see that we are making a HTTP POST request to the following endpoint: https://api.sandbox.africastalking.com/version1/messaging.
we are using Python Requests library (if this is new to you I suggest you check out a few tutorials on google about Python Requests library.) to pass data and standard request headers to the Sandbox endpoint URL.
We did use .json() to get the response in dictionary format so it becomes easy to access values in the response object by key.
Africastalking has two endpoints shown below
Endpoints:
Live : https://api.africastalking.com/version1/messaging
Sandbox: https://api.sandbox.africastalking.com/version1/messaging
Sandbox is used for testing your app functionality and you are allowed to make errors here but when you are now confident with everything you can go live with the Live endpoint URL.
The body of the request should contain the following fields:
Parameter
username String Required
Your Africa’s Talking application username.
to String Required
A comma separated string of recipients’ phone numbers.
message String Required
The message to be sent.
from String Optional
Your registered short code or alphanumeric, defaults to AFRICASTKNG.
The above four parameters are basically what we will be using in this tutorial , but we also have other optional parameters which I did not include here, if you want to check them out you can find them here on the Africastalking website Request parameters
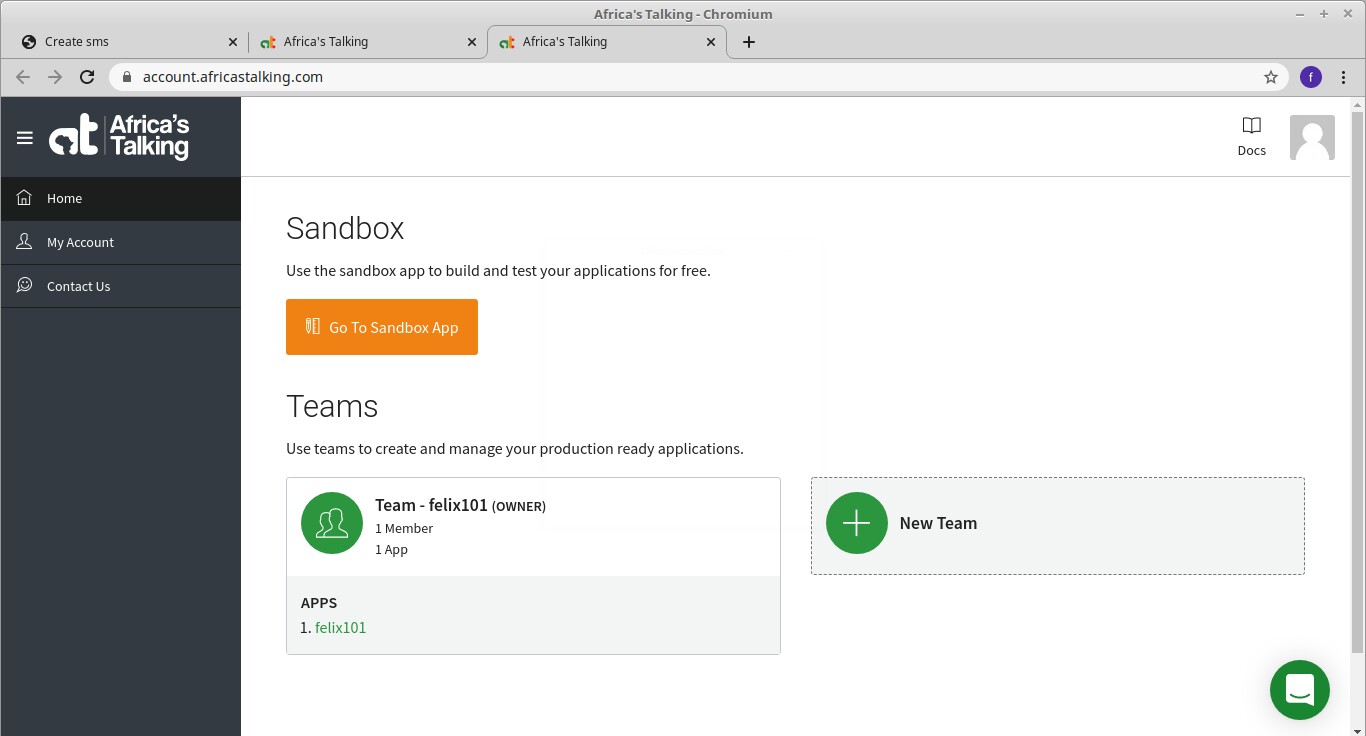
Now we need to login to Africastalking website and generate our apiKey(Africa’s Talking application apiKey) , and from short code that we will use in sending our SMS . you can login to Africastalking here Africastalking and if you do not have an account you can create one.
Once you login you will land on a page that looks like this.
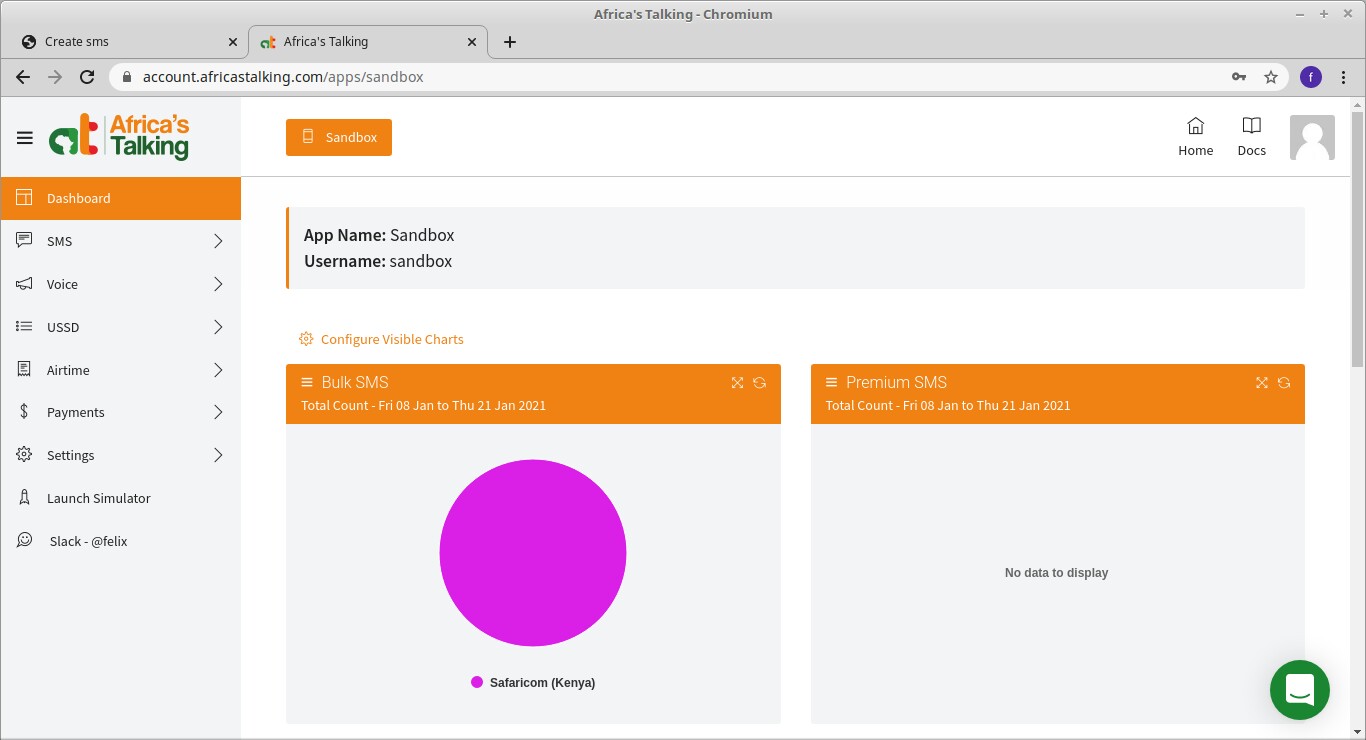
click on the link written go to sandbox and you see this page
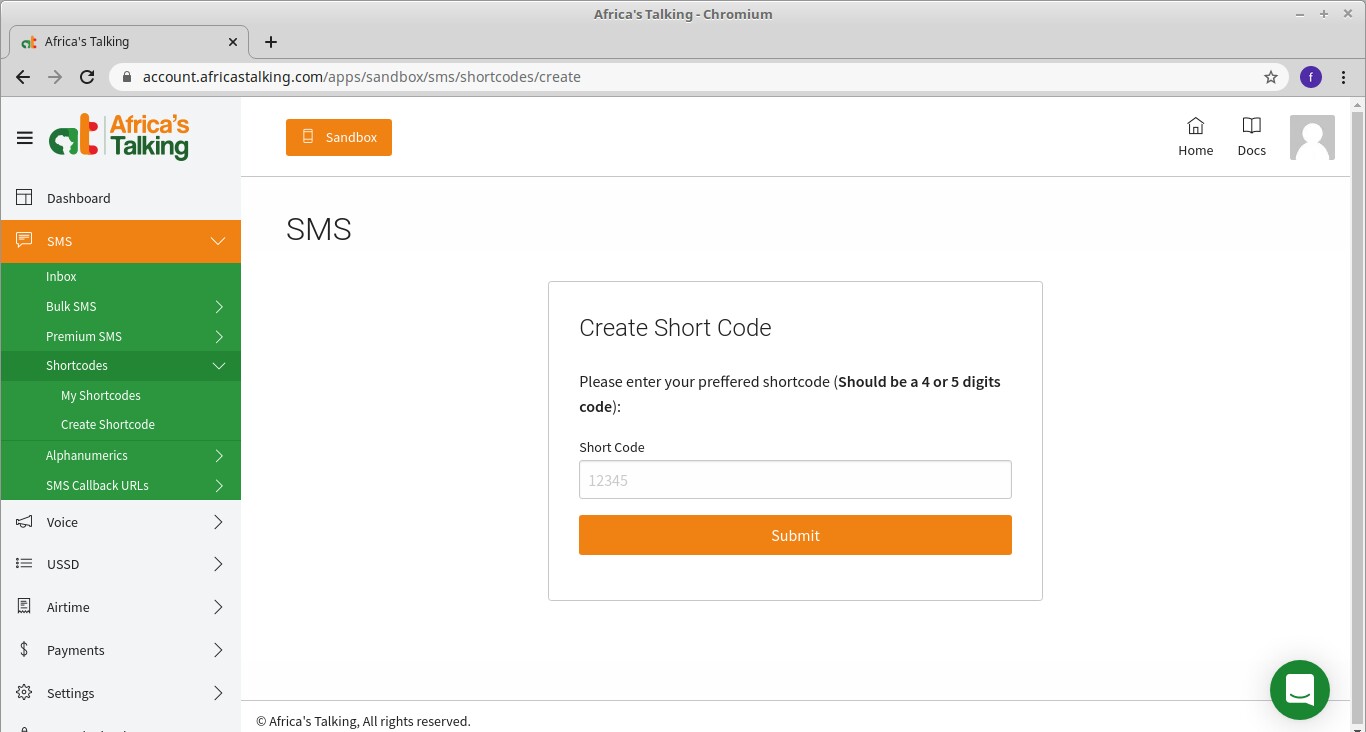
Now go to SMS>shortcodes>My shortcodes> create a short code and you will see this page, this is where you create your short code
Now that we got our short code , lets now generate our apiKey, for this we will have to go to Settings>API Key
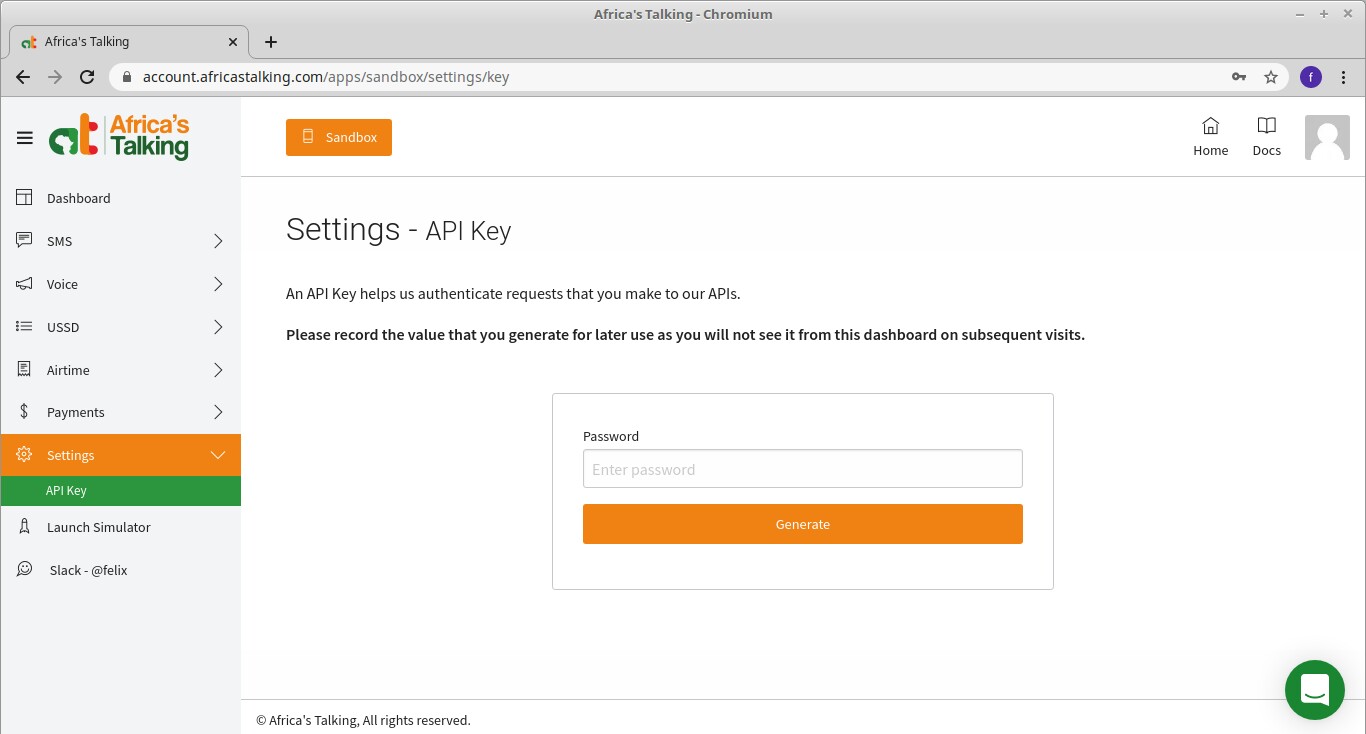
Please record the value that you generate for later use as you will not see it from the dashboard on subsequent visits.
So far we have the values of apiKey and from short code, Now create a file called sendsms.py on your computer and paste the following code in it
# sendsms.py

import requests

url = "https://api.sandbox.africastalking.com/version1/messaging"

headers = {'ApiKey': '9ea2c2ed6723e0ea77c7d81xyzxyz',
           'Content-Type': 'application/x-www-form-urlencoded',
           'Accept': 'application/json'}

data = {'username': 'sandbox',
        'from': '17163',
        'message': "Hello world !",
        'to': '+25472751xxxx'}


def make_post_request():
    response = requests.post( url = url, headers = headers, data = data )
    return response


print( make_post_request().json() )
- Set the value of
ApiKeyin the headers dictionary to the value of the apiKey you generated in the steps above - Leave the value of
usernamein data dictionary as'sandbox' - Set the value of
fromto the value of the short code we generated ealier, the value I have 17163 is just an example, replace that value with yours. - The
messagein data dictionary can be any message you want to send , put your message there. tois the number you want to send the message to, note that the number starts with country code, kenya's country code is +254
Finally the function make_post_request() is a function that makes a POST request to Africastalking API , it passes headers and data in the POST request.
The last line print( make_post_request().json() ) is printing the response we got in dictionary format.
Before you run this python code there is one last step I want you to do, Go to your Africastalking sandbox dashboard and click Launch simulator, you will see the following page.
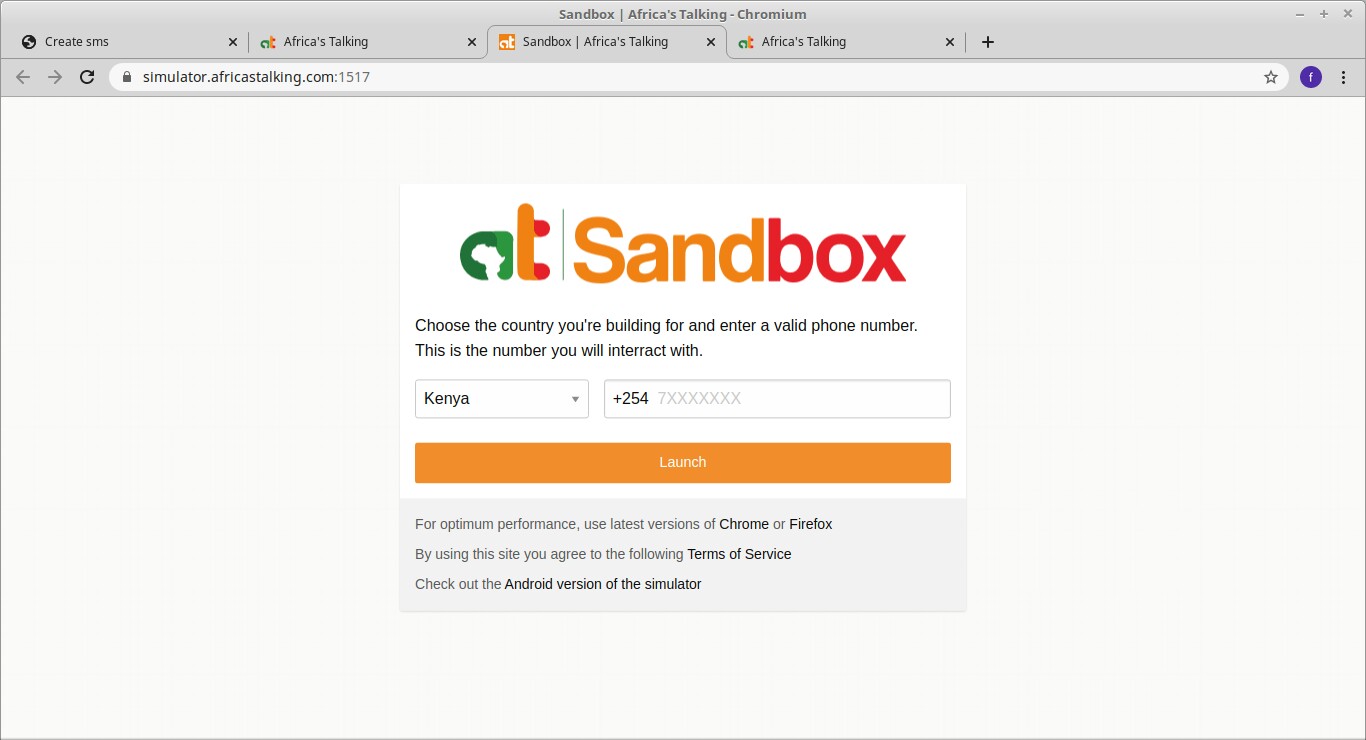
Put your phone number here and you will be redirected to a page that looks like this
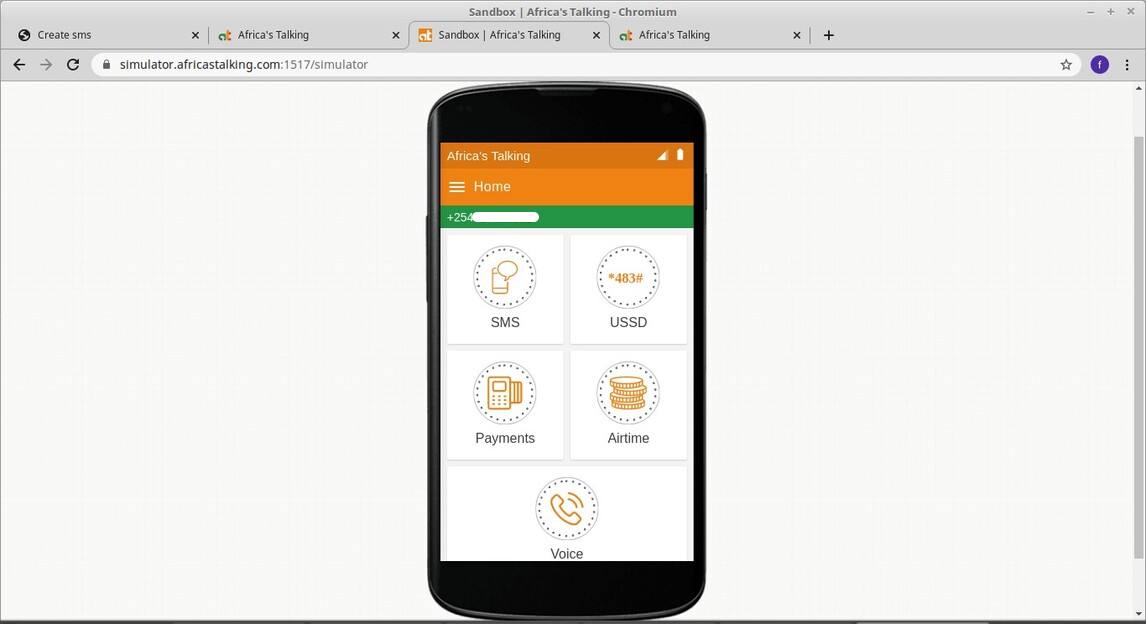
Click on the SMS icon, now go back to the sendsms.py file we created above and run it like so
python sendsms.py
you will get the following output
{'SMSMessageData': {'Recipients': [{'statusCode': 101, 'cost': 'KES 0.8000',
'number': '+25472751xxxx',
'messageId': 'ATXid_cbd6744abe8226cf26d8b5da94a847ae',
'status': 'Success'}],
'Message': 'Sent to 1/1 Total Cost: KES 0.8000'}}
From this response, you can see that it is a nested dictionary , we will see how to extract data from this nested dictionary later. If you look at the simulator we opened , you will see the message that we sent
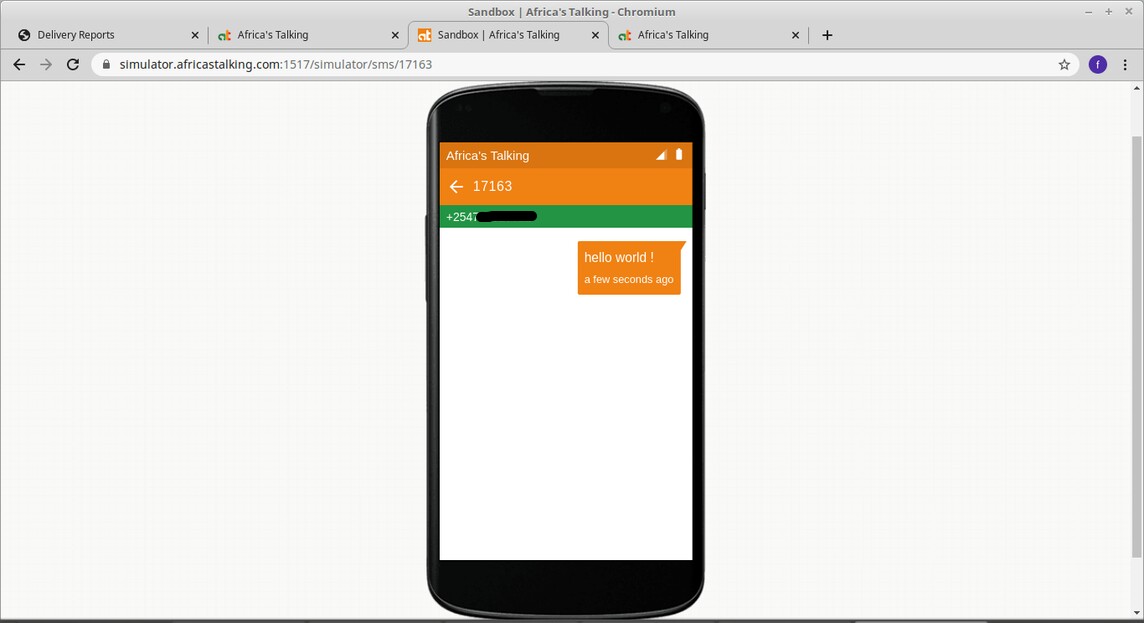
You see we received a message in our simulator ! congratulations we have learnt how to send an SMS using the python code we wrote to our simulator phone. If you look closely you will see the short code is up there mine is 17163 yours might be different. In short your short code is your identity. In the next section we will look at how we can receive messages sent to our app from people.
How we receive messages from users to our app using Africastalking API
Receiving messages in your app is done through the Africastalking API. So this is how it works
Someone generates an SMS message in their phone by entering the recipient number as the short code of our app, in our example my short code was 17163 so that means the user will enter 17163 as the recipient number. After that he/she types the message he wants to send to our app, and presses the send button. After sending the message , Africastalking will in turn POST that message to a callback URL that we have to register with them
For example
Lets say we did register our callback URL in Africastalking website as https://sayari3/smsapp/incoming_message
and our corresponding view would look like
@csrf_exempt
@require_POST
def incoming_message(request):
    """
    sample incoming message from phone through AfricasTalking API
    {  'from': ['+2547278153xx'],
     'linkId': ['28a92cdf-2d63-4ee3-93df-4233d3de0356'],
       'text': ['heey this is a message from a phone'],
         'id': ['b68d0989-d856-494f-92ee-7c439e96e1d9'],
       'date': ['2021-01-14 08:10:15'],
         'to': ['17163'] }
    """
    date = request.POST.get('date')
    text = request.POST.get('text')
    phoneNo = request.POST.get('from')
    to = request.POST.get('to')
    linkId = request.POST.get('linkId')
    date = datetime.datetime.strptime(date, '%Y-%m-%d %H:%M:%S')
    aware_datetime = make_aware(date)
    Inbox_object = Inbox(
                        date=aware_datetime,
                        text=text,
                        phone=phoneNo,
                        to=to,
                        linkId=linkId
                        )
    Inbox_object.save()
    return HttpResponse(status=200)
So what will happen is , After someone sends a message to your app via our short code Africastalking will POST the message to our view and now we will have to extract that message from the POST request just as seen above
Another important thing we have in our view above is : @csrf_exempt
This decorator is doing exactly what its name is saying, it is exempting our view from csrf protection because the data here is coming from an external API, which in our case its receiving messages sent from users to our app via Africastalking, this is like a door where Africastalking will deliver our message from users.
Checkout more about @csrf_exempt here This is a security issue you should take seriously.
Another important decorator is @require_POST
Again this decorator is doing exactly what its name is saying, it is only going to allow POST request to pass through, anything else is rejected.
We also have make_aware( ) method. This method makes a naive datetime.datetime in a given time zone aware. read more on this here
Using Django SMSapp Now here I will take you through how to install the Django sms app that I have already created and its on GitHub , this will help you understand how the whole thing works together.
Django SMS app Source Code
You can clone the app here or download it to your local computer
$ git clone https://github.com/felix13/sms.git
Once you have the app on your local computer , create a .env file to hold your sensitive passwords and API keys as environment variables in your root project directory, if you dont know where that is , just find your .manage.py file and create the .env file on the same level as that file.
Inside that file create the following
SECRET_KEY="put your django secret key here"
AT_API_KEY="put  your africastalking api key here"
AT_USER_NAME=sandbox
AT_FROM_VALUE="put your africastalking from value here"
You will have to leave your AT_USER_NAME as sandbox since we will be testing our app in the sandbox.
After that run the following commands
pip install -r requirements.txt
python manage.py migrate
python manage.py runserver
After that you should have Django development server running.
The next thing we need to do is to expose our app to the internet , this will enable us to interact with external APIs which in our example we will be using Africastalking API. for us to achieve that we will need to use ngrok
So What is ngrok ? Straight from the official documentation , it says
ngrok allows you to expose a web server running on your local machine to the internet. Just tell ngrok what port your web server is listening on.
The next step is to run ngrok
We will do it with the following command,
ngrok http 8000run it on the command line or terminal on the same level as the .manage.py file
you will see something like
Session Status  online
Session Expires 1 hour, 58 minutes
Version    2.3.35
Region     United States (us)
Web Interface   http://127.0.0.1:4040
Forwarding  http://0594586a9fec.ngrok.io -> http://localhost:8000
Forwarding  https://0594586a9fec.ngrok.io -> http://localhost:8000
We have now exposed our web server to the internet and our URL is https://0594586a9fec.ngrok.io yours will be different just look at the Forwarding part above and you will see your URL there.
Note: this is just a temporary URL that expires after about 1 hour, it is just used for testing purposes and is not permanent.
We need to register this URL or domain in our settings.py file, open your settings file and add this
ALLOWED_HOSTS = ['127.0.0.1','localhost', '0594586a9fec.ngrok.io']The next step is to register our callback URLS on Africastalking website, we need to register
- SMS Delivery Reports Callback
- SMS Inbox Callback
SMS Delivery Reports Callback This callback is responsible for receiving delivery reports from Africastalking API, it tells us whether the message we sent was sent successfully or not. SMS Inbox Callback This callback is responsible for receiving messages that is sent to our app by people.
Registering SMS Delivery Reports Callback
Go to Africastalking website here login and got to SMS>SMS Callback Urls>Delivery Reports Callback
You will see a form where you are supposed to put your Delivery Reports Callback , the SMS app I prepared has a view to catch delivery reports and this view is found at
/smsapp/incoming_delivery_reports
So lets say the URL that was generated by ngrok was https://0594586a9fec.ngrok.io
Our delivery report URL will now be found at
https://0594586a9fec.ngrok.io/smsapp/incoming_delivery_reports
This is the URL that we will be registering in the form that was geneated above and submit it.
Registering SMS Inbox Callback
This process is similar to the one above, just that the URL for receiving inbox from users is at /smsapp/incoming_message
So the full URL path together with the URL provided to us by ngrok becomes https://0594586a9fec.ngrok.io/smsapp/incoming_message , this is the URL that you will enter in the form that is found at SMS>SMS Callback Urls>Incoming messages.
After registering both SMS Delivery Reports Callback and SMS Inbox Callback , its now time to test the whole thing.
The SMS app has three parts
- Outbox - has a table showing all outgoing messages.
- Delivery reports - has a table that shows the status of message sent, whether it was successful or not.
- Inbox - shows all received messages from people.
You can now click on create sms button and create your message by entering the recipient phone number starting with country code e.g +254 if you are in Kenya and then create the SMS message and click on the send button , also make sure you have opened Africastalking simulator like the one we opened a few steps above.
After clicking the send button you should be able to see the message appear in your simulator. That is it, you have reached the end of this tutorial, hope you learnt something.
Resources Header photo by @linkedinsalesnavigator on unsplash
Keep Learning
- How to Host your Django StaticFiles and MediaFiles on DigitalOcean Spaces Object Storage
- Difference between Django forms.Form and forms.ModelForm
- How to Serve Django's Static Files with NGINX on Localhost