Django Authentication Tutorial
We are going to look at how authentication works in a Django application, we will cover user registration, user login, changing user details, changing password and logging out.
If you prefer going straight to the source code, you can get it below
GET SOURCE CODE
https://github.com/felix13/django-simple-authentication-system
A complete Django authentication system must have the following
- A way of login in a user
- We should be able to register a new user
- A user should be able to edit his/her details
- Users should be able to change their passwords
- Finally users should be able to logout
We are going to look at how we can implement each of the above, we will start with user login.
USER LOGIN
# views.py

def user_login(request):
    form = LoginForm()
    if request.method == 'POST':
        form = LoginForm(request.POST)
        if form.is_valid():
            username = form.cleaned_data.get("username")
            password = form.cleaned_data.get("password")
            user = authenticate(username=username, password=password)
            if user is not None:
                login(request, user)
                return redirect(request.GET.get('next', 'home'))
            else:
                messages.error(request, 'Check your login details and try again',
                               extra_tags='alert alert-danger alert-dismissible fade show'
                              )
                return redirect("home")


    return render(request, "mysite/login.html", {"form": form})
Here we are checking if request is a POST request, if not we show the user the login form, we will see later how the login form is generated.
If the request is a POST request, we will do the following
Get user details which are the users username and password, we do that with the following lines
username = form.cleaned_data.get("username")
password = form.cleaned_data.get("password")
Authenticate the user with the following line
user = authenticate(username=username, password=password)
This makes sure the user exist and the credentials are correct.
if user is not None We login the user with login(request, user), if user is None we display a message telling the user to check their details.
Lastly we get the value of next in the request if it exist, this will hold the value of the next page that the user will be redirected to after logging in, if it does not exist , we redirect the user to home.
By default, the path that the user should be redirected to upon successful authentication is stored in a query string parameter called "next".
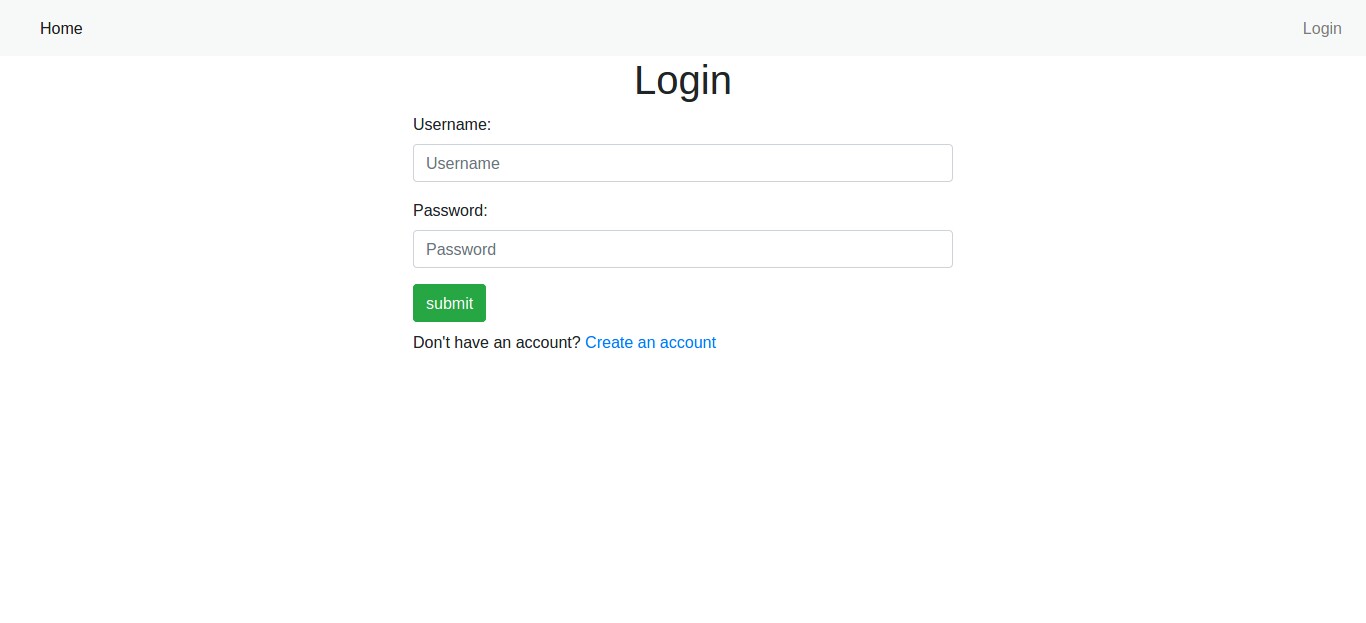
Login Form
 # forms.py

class LoginForm(forms.Form):

    username = forms.CharField(
                     max_length=30,
                     widget=forms.TextInput(attrs={'class': 'form-control', 'placeholder': 'Username'}))

    password = forms.CharField(
                      max_length=30,
                      widget=forms.PasswordInput(attrs={'class': 'form-control', 'placeholder': 'Password'}))
The login form will look like this
USER REGISTRATION
# views.py

def register_user(request):
    if request.method == 'POST':
        form = UserRegistrationForm(request.POST)
        if form.is_valid():
            form.save()
            username = form.cleaned_data.get('username')
            password = form.cleaned_data.get('password1')
            user = authenticate(username=username, password=password)
            login(request, user)
            messages.success(request, 'Registration was successful',
                             extra_tags='alert alert-success alert-dismissible fade show'
                            )
            return redirect('home')
    else:
        form = UserRegistrationForm()
    return render(request, 'mysite/register.html', {'form': form})
In our user registration view, we check whether the request is a POST request, if not we show the form to the user in the template.
If the request is a POST request we do these three things
- register the user , we used UserCreationForm which uses User model , so that means once we hit save our user will be created automatically.
- We get the username and password and then authenticate that user, after that we login the user in with login(request, user)
- We show a message to the user , we simply tell him/her that registration was successful with the following line messages.success(request, 'Registration was successful', extra_tags='alert alert-success alert-dismissible fade show' )
The extra_tags will help us in styling the message in the template.
Registration Form
# forms.py

class UserRegistrationForm(UserCreationForm):
    username = forms.CharField(max_length=30, widget=forms.TextInput(attrs={'class': 'form-control'}))
    first_name = forms.CharField(max_length=30, widget=forms.TextInput(attrs={'class': 'form-control'}))
    last_name = forms.CharField(max_length=30, widget=forms.TextInput(attrs={'class': 'form-control'}))
    email = forms.CharField(max_length=75, widget=forms.EmailInput(attrs={'class': 'form-control'}))
    password1 = forms.CharField( label="password",  max_length=100, widget=forms.PasswordInput(attrs={'class':'form-control', 'placeholder':'password'}))
    password2 = forms.CharField(label ="confirm password", max_length=100,widget=forms.PasswordInput(attrs={'class':'form-control', 'placeholder':'Confirm password'}))

    class Meta:
        model = User
        fields = ('username', 'first_name', 'last_name',  'email', 'password1', 'password2')

    def clean_email(self):
        email = self.cleaned_data.get('email')
        if User.objects.filter(email=email).exists():
            raise forms.ValidationError("Email  is already in use.")
        return email
Here our UserRegistrationForm is a subclass of UserCreationForm, we also have a function that cleans the users email, it makes sure the email entered is not being used by another user in our app.
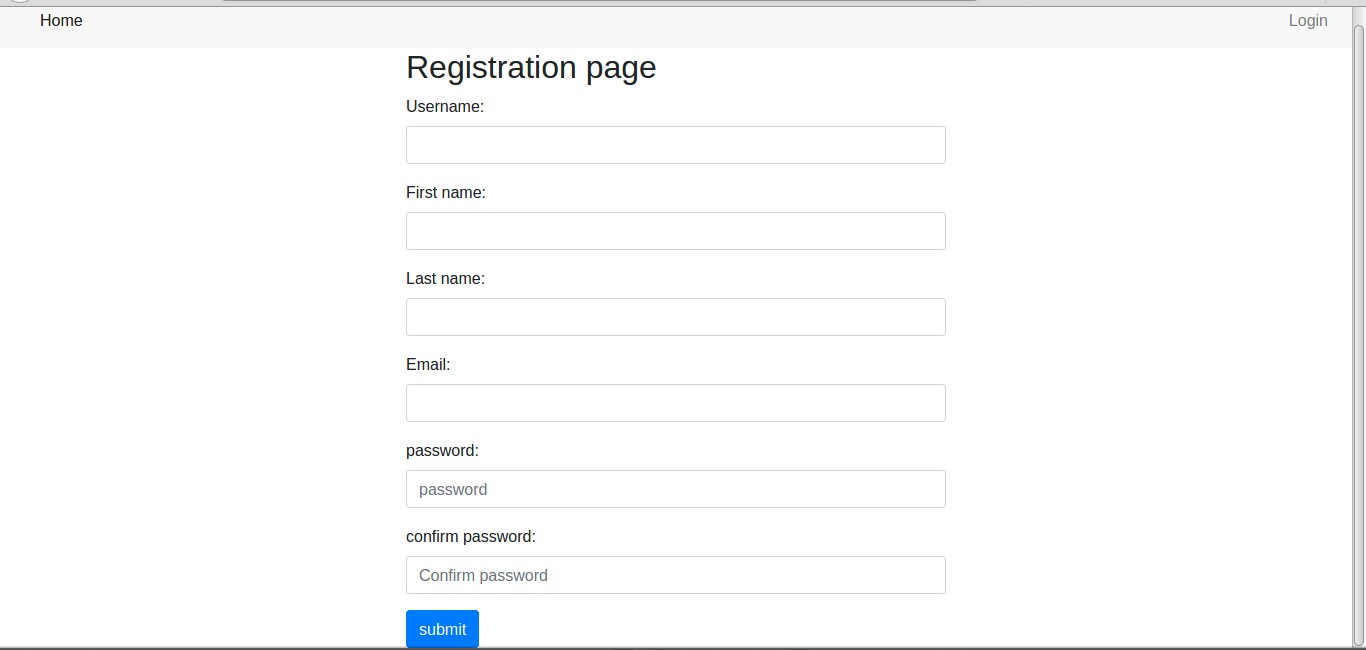
How registration form looks like
Changing User Details
A user can also change their details if they want to, for example, they can change their firstname or lastname or even their email address.
# views.py

def edit_user_info(request):
    form = UserProfileForm(instance=request.user)
    if request.method == 'POST':
        form = UserProfileForm(request.POST, instance=request.user)
        if form.is_valid():
            form.save()
            messages.success(request, 'Your changes were successfully saved ',
                             extra_tags='alert alert-success alert-dismissible fade show'
                            )
            return redirect('home')

    return render(request, 'mysite/edit_user_info.html', {'form': form})
Here we simply check if the request is POST if not then show the user a form with his details as they are in our database.
If the request is a POST request, we save the form with the changed details and display a message to the user informing him/her that the changes were made successfully.
UserProfileForm
 # forms.py

class UserProfileForm(forms.ModelForm):
    first_name = forms.CharField(max_length=30, widget=forms.TextInput(attrs={'class': 'form-control'}), required=False)
    last_name = forms.CharField(max_length=30, widget=forms.TextInput(attrs={'class': 'form-control'}), required=False)
    email = forms.CharField(max_length=75, widget=forms.EmailInput(attrs={'class': 'form-control'}), required=False)

    class Meta:
        model = User
        fields = ('first_name', 'last_name', 'email',)
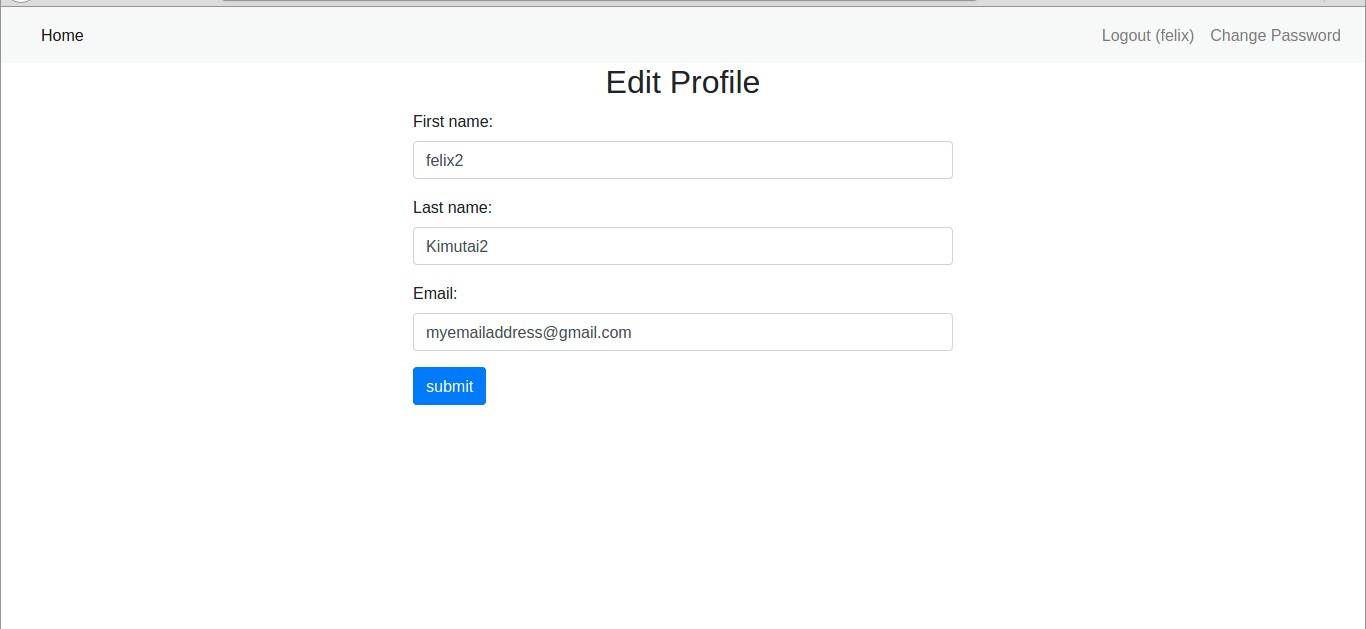
Edit user profile screenshot
CHANGE PASSWORD
Users should also be able to change their passwords, here we look at how they achieve that.
# views.py

def change_password(request):
    if request.method == 'POST':
        form = ChangePasswordForm(request.user, request.POST)
        if form.is_valid():
            user = form.save()
            update_session_auth_hash(request, user)
            messages.success(request, 'Your password was successfully changed!',
                             extra_tags='alert alert-success alert-dismissible fade show'
                            )
            return redirect('home')
        else:
            messages.error(request, 'Please correct the error below.',
                           extra_tags='alert alert-danger alert-dismissible fade show'
                          )
    else:
        form = ChangePasswordForm(request.user)
    return render(request, 'mysite/change_password.html', {
        'form': form
    })
Here we check if the request is a POST request, if not then show a form that the user will use to change his password.
if the request is a POST request , we will save the changes and display the message to the user informing him/her that the changes were successful.
If there is an error , we display the form to the user again with the errors and a message informing him/her that there was an error.
This line update_session_auth_hash(request, user) updates the session after changing password so that the user isn't logged off.
ChangePasswordForm
 # forms.py

class ChangePasswordForm(PasswordChangeForm):
    old_password = forms.CharField(widget=forms.PasswordInput(attrs={'class':'form-control', 'placeholder':'Old password'})  )
    new_password1 = forms.CharField(widget=forms.PasswordInput(attrs={'class':'form-control', 'placeholder':'New password' }) )
    new_password2 = forms.CharField(widget=forms.PasswordInput(attrs={'class':'form-control', 'placeholder':'New password confirmation' }) )

    class Meta:
        model = User
        fields = ('old_password', 'new_password1', 'new_password2',)
Change password screenshot

LOGGING OUT A USER
Logging out a user is easy , we do it like this
 # views.py

def user_logout(request):
    logout(request)
    return redirect('login_user')
NOTE: In this tutorial I bundled everything into one app to make it easier to understand but it is normal practice to separate authentication system into its own separate app.
GET SOURCE CODE
https://github.com/felix13/django-simple-authentication-system
RESOURCES
Using the Django authentication system
Django Tips #9 How to Create a Change Password View
Header photo by Markus Spiske on unsplash
Keep Learning
- Django Class Based Views vs Function Based Views
- What Is The Difference between AbstractUser and AbstractBaseUser in Django ?
- What Is Select_related in Django